
- eIDs
- Finnish Trust Network
eIDs
Finnish Trust Network
Learn more about Finnish Trust Network token contents, how to create test users and how to gain access to production.
The New FTN Security Requirements
The Finnish government is introducing new requirements to increase the level of security and privacy of FTN authentication. The requirements are described in Recommendation 213/2023 S Finnish Trust Network OpenID Connect Profile and include:
- Private Key JWT client authentication
- Authentication request signing
- Encrypted
tokenanduserinforesponses - Statically configured JWK sets for signing and encryption
Client applications must be able to fulfill the new requirements to continue offering FTN logins, regardless of the chosen FTN broker. All changes must be implemented by August 31, 2025.
Technical guides
Technical guides for each requirement are provided below:
- Private Key JWT client authentication
- Authentication request signing
- Encrypted token and userinfo responses
- Statically configured JWK sets
Should you encounter any challenges or need further assistance, please do not hesitate to reach out to our support team at support@criipto.com or via Slack.
Test your implementation
Once you've implemented the changes described in the technical guides, you can test your setup by running test logins with enforced FTN requirements. There are two ways to do this:
- Per-request enforcement: Add
login_hint=enforce_ftn_requirementsto an authorization request. This allows you to test individual requests. - Global enforcement: Activate the
Enforce FTN requirementstoggle in your Criipto Dashboard undereID providers>FTN.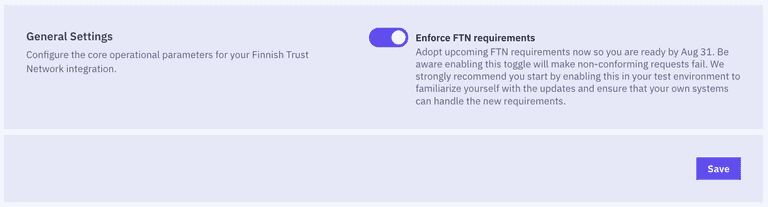
When enforce FTN requirements setting is active, any non-compliant authorization requests will fail. The failure will include a detailed error message to help you identify any misconfigurations or missing steps in your implementation.
Private Key JWT client authentication
Your application must use private_key_jwt client authentication instead of client_secret to authenticate to Criipto.
Please refer to the Private Key JWT authentication guide for instructions on configuring private_key_jwt client authentication. Note that FTN requires:
- Statically configured JWK sets.
- A
kidin the JWT header of theclient_assertion. - The
jticlaim included in theclient_assertion.
Authentication request signing
Your application must sign authorization requests to Criipto and send them as JWT-secured Authorization Requests(JARs).
A JWT-secured Authorization Request is a method where the request parameters are encapsulated in a JSON Web Token (JWT) signed by your application’s private key and included in the authorization request via the request parameter.
Authentication request signing enhances security by guaranteeing that the request originated from your application and has not been tampered with. To understand the benefits in more detail, see: Why Signed Authorization Requests Elevate Your Security.
Creating a signed authorization request
To create a signed authorization request, you first create a JWT where the payload contains your request parameters, plus appropriate issuer and audience.
The JWT is then signed using your application's private signing key and added to the authorization request via the request parameter. The private signing key used for private key JWT client authentication can be used to sign authorization requests.
Your signed authorization request will look something like this:
https://acme-corp.criipto.id/oauth2/authorize?client_id=your_client_id&request=eyJhbGciOiJNilhcmxzZXYifQ.eyJpc3MiOiJ5b3VyX2Nsa9pZCI...
where the only two parameters directly included in the URL are:
client_id: contains the Client ID of your Criipto applicationrequest: contains Request Object (the JWT whose claims hold the JSON-encoded authorization request parameters)
The code sample below demonstrates creating a Request Object JWT, then building authorize URL in a Node.js/Express application.
import * as jose from 'jose';

// Generate a signed JWT (Request Object)
const createSignedRequestObject = async (signingKey) => {
  // Define parameters for your authorization request
  const requestObjectPayload = {
    response_mode: 'query',
    response_type: 'code',
    client_id: CLIENT_ID,
    redirect_uri: REDIRECT_URI,
    state: state,
    scope: 'openid',
    login_hint: 'enforce_ftn_requirements', // optional login_hint used to test a request for compliance with FTN requirements
  };

  // Create and sign the JWT
  const signedJwt = await new jose.SignJWT(requestObjectPayload)
    .setProtectedHeader({
      alg: 'RS256',
      kid: SIGNING_KEY_KID,
    })
    .setIssuer(CLIENT_ID)
    .setAudience(`https://${CRIIPTO_DOMAIN}`)
    .sign(signingKey);

  return signedJwt;
};

// Example usage in an Express route
app.get('/login', async (req, res) => {
  try {
    const privateSigningKey = 'YOUR_SIGNING_KEY_HERE';
    const requestObject = await createSignedRequestObject(privateSigningKey);

    // Build authorize URL
    const authorizeUrl = `https://${CRIIPTO_DOMAIN}/oauth2/authorize?client_id=${CLIENT_ID}&request=${requestObject}`;

    res.redirect(authorizeUrl);
  } catch (error) {
    console.error('Error during login:', error);
    res.status(500).send('Login failed.');
  }
});
Encrypted token and userinfo responses
Criipto will apply JSON Web Encryption (JWE) to secure token and userinfo responses resulting from FTN authentication.
This means that after a successful code-for-token exchange, the id_token (and userinfo if requested) will be sent to your application in a JWE format, rather than a standard JWT.
These JWEs are encrypted using your application's public encryption key, requiring you to use the corresponding private key to decrypt them.
For a deeper dive into JWE, please refer to our blog posts:
To configure your application to handle encrypted token and userinfo responses, follow the steps below:
1. Generate a new key pair
FTN requires that you use different key pairs for signing and encryption. Therefore, you'll need to generate a separate key pair for encryption, distinct from the one used for Private Key JWT authentication and authentication request signing.
import * as jose from 'jose';

async function generateEncryptionKeyPair() {
  try {
    const { publicKey, privateKey } = await jose.generateKeyPair('RSA-OAEP-256'); // For a list of supported key generation algorithms, see your OIDC Discovery Document at https://yourdomain.criipto.id/.well-known/openid-configuration.
    const jwk = await jose.exportJWK(publicKey); // Export public key to JWK format
    const kid = await jose.calculateJwkThumbprint(jwk); // Generate a Key ID for the public key

    const jwks = {
      keys: [
        {
          ...jwk,
          kid,
          use: 'enc', // Indicate this key is for encryption
        },
      ],
    };
    // Log the JWKS (public key in JWK Set format)
    console.log('JWK Set (Public Key):', JSON.stringify(jwks, null, 2));
    // Your private key here. Ensure to store your private key in a secure environment.
    console.log('Private Key:', privateKey);
    return { publicKey, privateKey, jwks };
  } catch (error) {
    console.error(error);
    throw error;
  }
}
2. Register your encryption keys with Criipto
Go to your Application settings in the Criipto Dashboard. Under OpenID Connect > Client JWKS, add your newly generated public encryption key alongside your existing public signing key.
The resulting JSON will look something like this:
{
  "keys": [
    {
      "kty": "RSA",
      "use": "enc",
      "kid": "E1F0D80A379B4F9C8EE7043875345265",
      "e": "AQAB",
      "n": "zwEbepsvbT4TpZNecCtmJnMhALAH0sqlpllZdkI6AsRGou_cxakr8b8HKjjYWiyb-RJzbScGxBLPVK4k9RcEOL3PxoGoSIABEE1-NinDoiTYaSRIYwd7N914vWSGgfs7ctMy7vYRXmTBoc_NuLQkl79Fu2tFjXbLyAgGfnePkZUrFJqCXwCB553QYXJ0Lw4B8P8MFjy80YShI1wBQmCfj5BpZbACN5u5-84233KTHqYIkGOTrF4FZwVRvAkNutjiwMIzwKYGRj2qjdmelmqDlgiPre5UP8Cfnl7Urm411JhueWo7mrvJAcwHMpcyE4Rsuyhm93bv0hBDe5ddt-r4cw"
    },
    {
      "kty": "RSA",
      "use": "sig",
      "kid": "08E538B6D3B346A8B61322A4FAFB35CC",
      "e": "AQAB",
      "n": "0TGwj4SywrEU3IYBBm-HlxyI7zKQkjM6Y4PEZNNBmoIFk4kU8J5xVNkbkqnv_SwKrKJD3JbYK18zLvyu05xVDxXEZR8FkipGaXisGOuXuo_A8Gswe_-LLYfN3N-bpcID9E8FnSq6todIO8umD50W9VdGSoO_WxBiffnpnpXDihTuGSLLSdhWz6vz7-VY_Uphv6V87FfqU0OaMGLi7InsZlMSlquvb8LthOm22YvuiRkgkX1cMjW-uaWva7AMQJ6eKbOKRADnMGNjwlUOJkPsqUbCUGuMvNFwqh9JQCBHEvnwGz8Lmt8hNaK0uQ0nT3l2PFZ5_LsH9JrpxqCmD2LHeQ"
    }
  ]
}
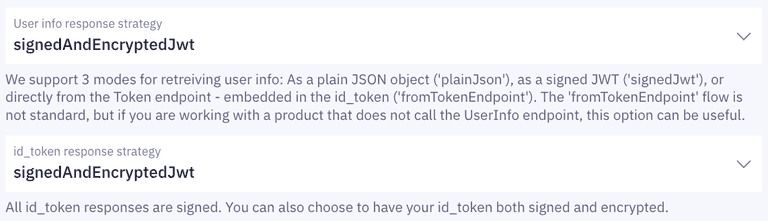
3. Configure response strategy
In the OpenID Connect section of your Application settings, set User info response strategy and id_token response strategy to signedAndEncryptedJWT.
4. Decrypt the received JWE in your application
After receiving the JWE, use the private key of your encryption key pair to decrypt it and retrieve the original signed JWT.
The code below uses jose library for JWE decryption and @criipto/oidc to handle code exchange.
import * as jose from 'jose';
import { OpenIDConfigurationManager, codeExchange } from '@criipto/oidc';

// Fetch Criipto's public keys for verifying the signature of the ID Token.
const jwks = jose.createRemoteJWKSet(new URL(`https://${CRIIPTO_DOMAIN}/.well-known/jwks`));

// Initialize the OpenID Configuration Manager to fetch the OIDC discovery document.
const configurationManager = new OpenIDConfigurationManager(
  `https://${CRIIPTO_DOMAIN}/.well-known/openid-configuration`
);

// The /callback route completes the authentication flow, managing the redirect after a user successfully authenticates.
// It handles the code-for-token exchange, decrypts the JWE and validates the resulting JWT.
app.get('/callback', async (req, res) => {
  const { code } = req.query;

  try {
    const configuration = await configurationManager.fetch();

    // clientAssertion is used for private_key_jwt client authentication which is required by FTN.
    const clientAssertion = 'YOUR_CLIENT_ASSERTION_JWT';

    // 1. Perform the code exchange at Criipto's token endpoint.
    // This step retrieves the ID Token, which for FTN will be encrypted (JWE).
    const codeResponse = await codeExchange(configuration, {
      code: code,
      redirect_uri: REDIRECT_URI,
      client_assertion_type: 'urn:ietf:params:oauth:client-assertion-type:jwt-bearer',
      client_assertion: clientAssertion,
    });

    const { id_token } = codeResponse;

    if (id_token) {
      const privateKeyForDecryption = 'YOUR_PRIVATE_DECRYPTION_KEY_HERE';

      try {
        // 3. Decrypt the JWE with compactDecrypt using your private decryption key.
        // The `plaintext` is the original signed JWT.
        const { plaintext: idTokenSignedJwt } = await jose.compactDecrypt(
          id_token,
          privateKeyForDecryption
        );

        // 4. Verify the decrypted id_token's signature.
        const { payload: idTokenClaims } = await jose.jwtVerify(idTokenSignedJwt, jwks, {
          issuer: `https://${CRIIPTO_DOMAIN}`,
          audience: CRIIPTO_CLIENT_ID,
        });

        console.log('ID Token claims:', idTokenClaims); // At this point, `idTokenClaims` contain user information.
        res.redirect('/');
      } catch (decryptVerifyError) {
        console.error('ID Token processing error:', decryptVerifyError);
        res.status(500).send('Authentication failed.');
      }
    } else {
      console.error('No ID Token received in response.');
      res.status(500).send('Authentication failed.');
    }
  } catch (error) {
    console.error(error);
    res.status(500).send('Authentication failed.');
  }
});
Statically configured JWK sets for signing and encryption
FTN requires the use of static JWK sets (JWKS) rather than fetching JWKS dynamically from a dedicated endpoint. This means all keys (both for signing and encryption) must be registered on the Criipto Dashboard as Static JWKS.
You've addressed this requirement when you registered static JWKS in Criipto Dashboard while configuring Private Key JWT client authentication and Encrypted token and userinfo responses.
JWT/Token examples
The level of assurance for all Finnish authenticators is: Substantial
BankID
Mobillivarmenne
Same as BankID, except the satu property will have a value as well.
Test users
A set list of test users for the different banks are given below. Sometimes the test credentials will be shown also on the actual login page at the bank.
Aktia
Käyttäjätunnus: 12345678
Salasana: 123456
Turvaluku: 1234
Turvaluku 2: 1234
Danske Bank
Must use your own customer credentials. No real cash is withdrawn from your bank account.
Handelsbanken
Käyttäjätunnus: 11111111
Salasana: 123456
Turvaluku: 123456
Turvaluku 2: 123456
LähiTapiola
Käyttäjätunnus: 12345678
Salasana: any numbers
Tunnusluku: any four numbers
Tunnusluku 2: any four numbers
Nordea
Tunnus: 123456
Salasana: 1234
Vahvistustunnus: any four numbers
OP / Osuuspankki
Käyttäjätunnus: 123456
Salasana: 7890
Avainluku: any four numbers
POP Bank
Käyttäjätunnus: 11111111
Salasana: 123456
Turvaluku: 123456
Turvaluku 2: 123456
S-Bank
Käyttäjätunnus: 12345678
Salasana: any numbers
Tunnusluku: any four numbers
Tunnusluku 2: any four numbers
Savings bank
Käyttäjätunnus: 11111111
Salasana: 123456
Turvaluku: 123456
Turvaluku 2: 123456
Ålandsbanken
Käyttäjätunnus: 12345678
Salasana: any numbers
Tunnusluku: any four numbers
Tunnusluku 2: any four numbers
Oma Säästöpankki
Käyttäjätunnus: 11111111 / 22222222
Salasana: 123456
Turvaluku: 123456
Turvaluku 2: 123456
Ordering a production agreement
Prerequisites for getting access to the Finnish Trust Network
There are no formal prerequisites to be allowed to accept FTN logins in your application. But as described below you must fill out the necessary End Customer Agreement.
The filled out agreement will be reviewed by Telia Finland.
Access to the Finnish Trust Network, FTN, (BankID and the Mobile Certificate, Mobiilivarmenne) is provided by Telia Finland. In order to start using FTN you must accept the terms from Telia.
You need to download the End Customer Agreement (PDF), fill it out, and then return a signed copy to support@criipto.com.
When sending the signed copy, you must also provide your Criipto Production Domain as set up on your tenant at dashboard.criipto.com/domains
Other relevant documents in this context are the service description and the general terms from Telia Finland.
Once you have sent the signed End Customer Agreement we will enable production access for you tenant.