AWS Cognito - Integrations - Idura Verify Documentation
  1. Integrations
  2. AWS Cognito

AWS Cognito basics

Your AWS Cognito user pool must be configured without email as a required attribute.

Make sure you have configured an Amazon Cognito domain for your AWS Cognito user pool (in this example we picked https://idura-samples.auth.us-east-1.amazoncognito.com).
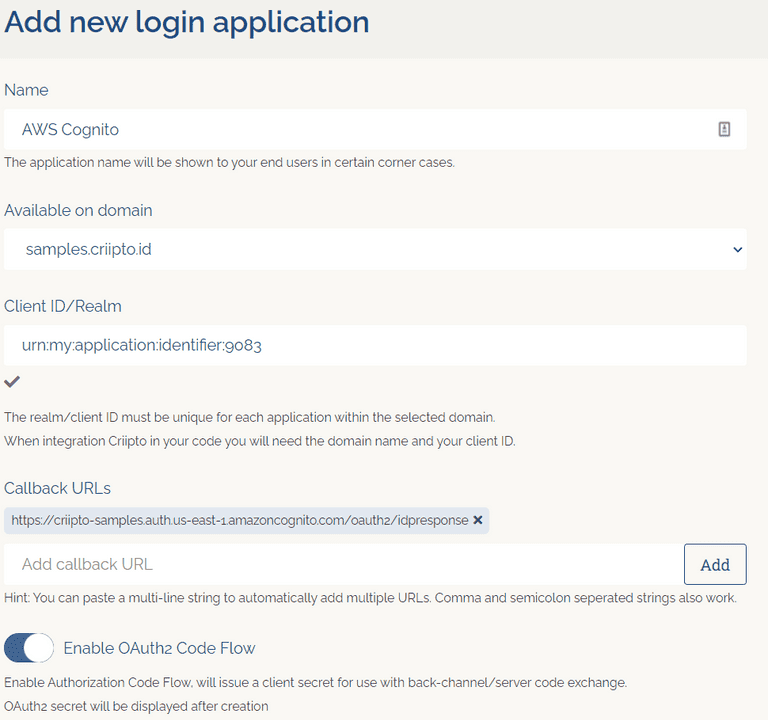
Register your AWS Cognito tenant in Idura Verify

First, create a new application for your AWS Cognito tenant in Idura Verify. This is done via the Idura Dashboard. When creating an application, register the redirect URL for your AWS Cognito Domain (https://<your-user-pool-domain>/oauth2/idpresponse).

Create Application

Once the application is created, you'll need some of its details for configuring AWS Cognito to communicate with Idura Verify. Gather the following information from the application settings:

  • Client ID to identify your AWS Cognito tenant to Idura Verify. We chose urn:idura:samples:aws:cognito for this example.
  • Domain on which you will be communicating with Idura Verify. We used acme-corp.idura.broker.
  • Client secret which AWS Cognito needs to fetch actual user information from Idura Verify during login. The secret is generated when you configure the OAuth2 code flow for your application.

Configure the OAuth2 code flow

If you are registering a new application, please save the initial configuration first.

After saving, you can configure the OAuth2 Code Flow for this application by following the three steps:

  1. Go to the OpenID Connect section of your Application settings and Enable OAuth2 Code Flow. OAuth2 client secret
  2. Copy the generated client secret. Note that this is the only time you will be shown the actual value of the client secret. Idura only stores this as a hashed value, which means you cannot retrieve the value once it has been generated and stored. OAuth2 client secret
  3. Set the user info response strategy to plainJson to enable retrieval of plain JSON user information from the /oauth2/userinfo endpoint. OAuth2 code flow Note that some libraries do not support the final userinfo request. In those cases, you will need to fetch the user data directly from the token endpoint as opposed to the userinfo endpoint. You can do this by choosing fromTokenEndpoint as a User info response strategy. User info response strategy

Idura Verify supports four modes for retrieving user information:

  • Plain JSON object (plainJson): User information is returned from the userinfo endpoint as a standard JSON object.
  • Signed JWT (signedJwt): User information is returned from the userinfo endpoint as a digitally signed JSON Web Token.
  • Signed and encrypted JWT (signedAndEncryptedJwt): User information is returned from the userinfo endpoint as a signed and encrypted JSON Web Encryption(JWE) object.
  • Directly from the token endpoint, embedded in the id_token (fromTokenEndpoint). The fromTokenEndpoint flow is not standard, but can be useful if you are working with a product that does not call the userinfo endpoint.

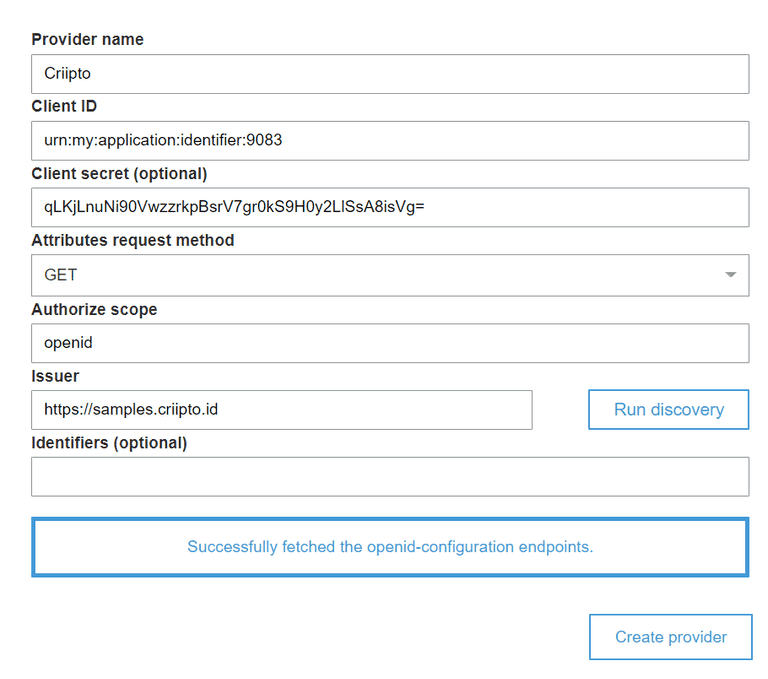
AWS Cognito provider setup

  1. Go to your existing or newly created AWS Cognito User Pool.
  2. Navigate to Authentication < Social and external providers, and click Add identity provider.
  3. Select OpenID Connect (OIDC).
  4. Fill in the Set up OpenID Connect federation with this user pool form similar to the following example:
AWS Cognito Provider example AWS Cognito Provider example

Assuming that your Idura Verify domain is acme-corp.idura.broker, configure the fields as follows:

  • Name: A name for Idura Verify identity provider. It's entirely up to you, we used "Idura" in this example.
  • Client ID: urn:idura:samples:aws:cognito (the Client ID/Realm value from your Idura Verify application).
  • Client secret: The secret generated by Idura Verify during the OAuth2 code flow setup.
  • Authorized scopes: openid will suffice.
  • Issuer URL: https://acme-corp.idura.broker (the Idura domain your application is registered on).
  1. After filling in the form, click Add identity provider.

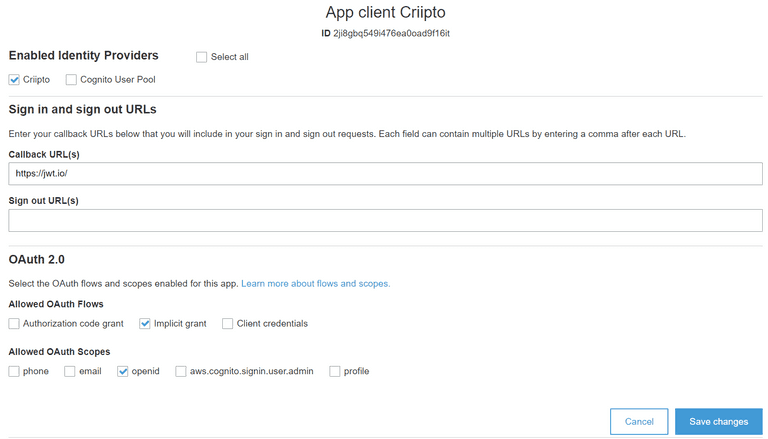
AWS Cognito application setup

  1. Create a new Cognito app client or use an existing one.
  2. Go to App clients and find your Cognito app client.
  3. Navigate to Login pages > Managed login pages configuration, and click Edit.
  4. Select "Idura" (or whatever provider name you picked for your AWS Cognito provider) as Identity provider.
  5. Add a callback URL to the Allowed callback URLs section.
  6. Set up OpenID Connect scopes.
  7. Click Save changes.

Perform a login

Launch the hosted UI for your AWS Cognito domain/client or perform an authorize request.

Common errors

  • invalid token_type in idp oauth response: Make sure the User info response strategy in your Idura application settings is configured as plainJson.