
- Integrations
- Okta
Integrations
Okta
This tutorial demonstrates how to integrate Criipto Verify with Okta
This tutorial demonstrates how to integrate Criipto Verify with Okta. The following steps are required to complete your first login:
- Register your Okta tenant in Criipto Verify
- Configure your OAuth2 flow
- Create Criipto Verify identity provider in Okta
- Integrate your application with Okta
In the following you will be configuring first Criipto Verify, then Okta. Once configured you may test that everything works from Okta.
The setup requires a bit of switching back-and-forth between Criipto and Okta's respective management dashboards, so we recommend that you have them open simultaneously to make the process really smooth.
Before you get started, you will need the following information:
- The callback URL for your Okta tenant - this will depend on the DNS name you use in Okta for running your logins. The value will probably look something like
https://your-company-name.okta.com/oauth2/v1/authorize/callback, but check your Okta settings to make sure. We have usedcriipto-samplesas a replacement foryour-company-namein this tutorial. - [Optional] The
post_logout_redirect_urlfor your Okta tenant.
Register your Okta tenant in Criipto Verify
First, you must register your Okta tenant as an application in Criipto Verify.
Once you register your Okta tenant, you will also need some of the information for configuring Okta to communicate with Criipto Verify. You get these details from the settings of the application in the dashboard.
Specifically you need the following information to integrate with Okta:
- Client ID to identify your Okta tenant to Criipto Verify. In the case below we chose
urn:criipto:verify - Domain on which you will be communicating with Criipto Verify. Could be for example
samples.criipto.id - Client secret which Okta needs to fetch actual user information from Criipto Verify during login. The secret is generated and copied as described further down.

If you plan on using single-signon, you must also register your Okta post_logout_redirect_url here so you can run single-logouts.
Configure the OAuth2 code flow
If you are registering a new application, please save the initial configuration first.
After saving, you can configure the OAuth2 Code Flow for this application by following the three steps:
- Go to the OpenID Connect section of your Application settings and Enable OAuth2 Code Flow.
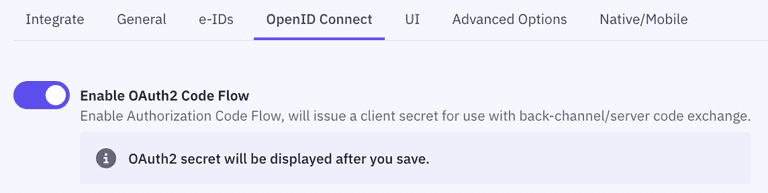
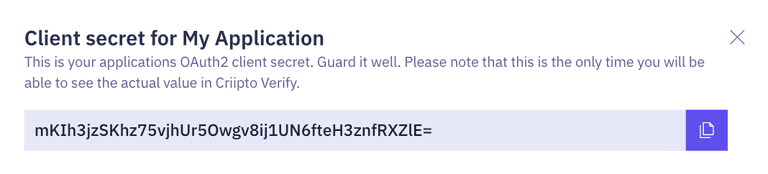
- Copy the generated client secret. Note that this is the only time you will be shown the actual value of the client secret. Criipto only stores this as a hashed value, which means you cannot retrieve the value once it has been generated and stored.
- Set the user info response strategy to
plainJsonto enable retrieval of plain JSON user information from the/oauth2/userinfoendpoint. Note that some libraries do not support the final
 userinforequest. In those cases, you will need to fetch the user data directly from thetokenendpoint as opposed to theuserinfoendpoint. You can do this by choosingfromTokenEndpointas aUser info response strategy.
Criipto Verify supports four modes for retrieving user information:
- Plain JSON object (
plainJson): User information is returned from theuserinfoendpoint as a standard JSON object. - Signed JWT (
signedJwt): User information is returned from theuserinfoendpoint as a digitally signed JSON Web Token. - Signed and encrypted JWT (
signedAndEncryptedJwt): User information is returned from theuserinfoendpoint as a signed and encrypted JSON Web Encryption(JWE) object. - Directly from the
tokenendpoint, embedded in theid_token(fromTokenEndpoint). ThefromTokenEndpointflow is not standard, but can be useful if you are working with a product that does not call theuserinfoendpoint.
Create Okta identity provider
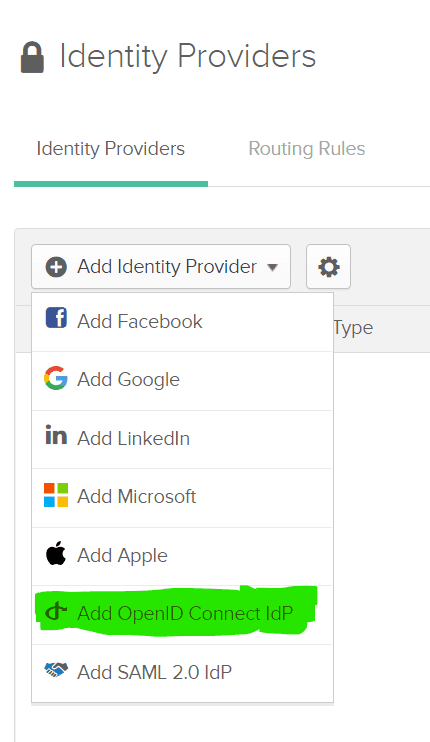
Make sure you are in Classic UI mode, and click on the Security -> Identity Providers item.

and click on the Add Identity Provider button, select OIDC for protocol.

Select Add OpenID Connect IdP
Fill in the form with values for you Criipto Verify application, similar to the following example
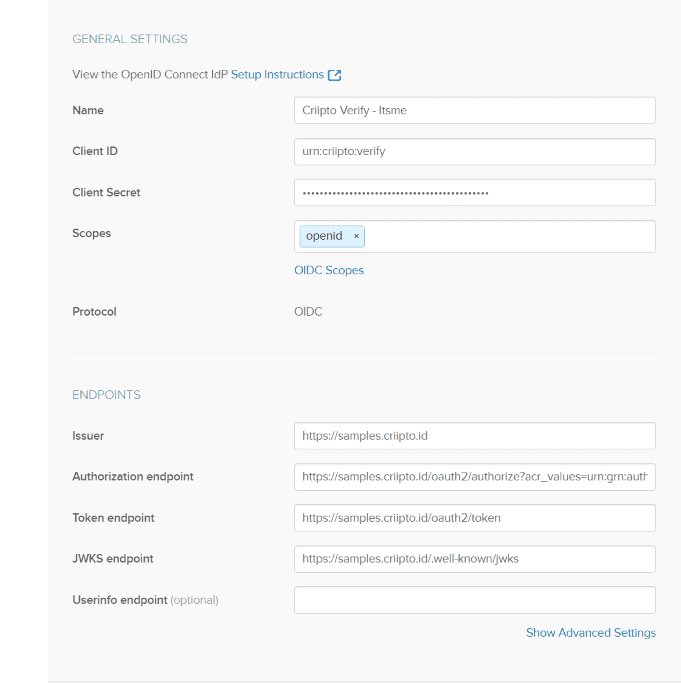
Given the values above, and assuming that your Criipto Verify domain is acme-corp.criipto.id you must add
- Client ID:
urn:criipto:verify(if you have set a different value in your Criipto VerifyClient ID/Realm, use that value instead here - they must match) - Client Secret: The secret generated for you by Criipto Verify during the
OAuth code flowsetup - Scopes:
openidwill suffice - Issuer:
https://acme-corp.criipto.id - Authorization endpoint:
https://acme-corp.criipto.id/oauth2/authorize?acr_values=urn:grn:authn:itsme:basic - Token endpoint:
https://acme-corp.criipto.id/oauth2/token - JWKS endpoint:
https://acme-corp.criipto.id/.well-known/jwks
The Name is entirely up to you, and you don't have to specify the optional Userinfo endpoint if you at the same time ensure that you configure your Criipto Verify application to use fromTokenEndpoint in the User info response strategy dropdown.
This setup assumes you are looking to authenticate your users with Itsme in basic mode. If you have other needs, replace the value of the acr_values parametery in the Authorization endpoint, or set up several Identity Providers in your Okta tenant - see below for a list of all supported values.
Supported acr_values
Criipto Verify supports a range of country and bank specific eID services. They are all accessed through the same endpoints, e.g. https://<YOUR COMPANY>.criipto.id/oauth2/authorize
To pick the login method you must set the acr_values parameter on the authentication request in order to choose the type of authentication you want. How you set this query string parameter varies with programming platform and your OpenID Connect library of choice.
The current list of possible values is:
| Login method | acr_values |
|---|---|
| Norwegian BankID | |
| Mobile or Web (user choice): | urn:grn:authn:no:bankid |
| Norwegian Vipps Login | |
| Login with Vipps app: | urn:grn:authn:no:vipps |
| Swedish BankID | |
| All options (user chooses): | urn:grn:authn:se:bankid |
| Same device: | urn:grn:authn:se:bankid:same-device |
| Another device (aka mobile): | urn:grn:authn:se:bankid:another-device |
| QR code: | urn:grn:authn:se:bankid:another-device:qr |
| Danish MitID | |
| Level low: | urn:grn:authn:dk:mitid:low |
| Level substantial: | urn:grn:authn:dk:mitid:substantial |
| MitID Erhverv (MitID Business): | urn:grn:authn:dk:mitid:business |
| Finnish Trust Network | |
| BankID: | urn:grn:authn:fi:bank-id |
| Mobile certificate (Mobiilivarmenne): | urn:grn:authn:fi:mobile-id |
| Both of the above: | urn:grn:authn:fi:all |
| Itsme | |
| Basic: | urn:grn:authn:itsme:basic |
| Advanced: | urn:grn:authn:itsme:advanced |
| Belgium | |
| Verified e-ID | urn:grn:authn:be:eid:verified |
You can find more details here
Test users
Almost all eID types have a notion of test users and real users.
Real users are real people logging in to a web site, thus voluntering their real name and typically also a social security number, SSN.
Test users are either created by you for the occasion, or we provide you with access to already created test users.
You may read more in the section on eIDs
Integrate your own application with Okta
How to integrate your application with Okta depends on the technology you are working with. Refer to the Okta developer documentation for more details.